This post is helpful for people studying for CCT/CCNA!
What is subnetting and how does it work?
What is subnetting? Subnetting is in basic terms dividing up a network in pieces so you can distribute unused addresses into multiple networks. Now, that is the very simple explanation, but how does it actually work?
Binary
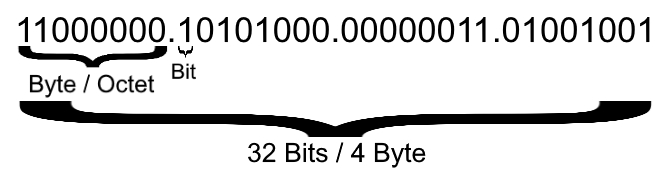
It all starts with binary. Binary works in powers of two, a binary number can either be on or off; a 1 or a 0. This is called a ‘bit‘. But I hear you telling: ‘But if binary can only be either a one or a zero then how can an IPaddress like ‘192.168.3.73’ work on my computer? Remembers that bit? If you put eight of them together you will get a byte, in terms of an IP address also called an octet, an IPv4 address is 4 bytes long. This means that an IPv4 address is 32 bits long. So what would that earlier mentioned IP address of ‘192.168.3.73’ look like? It would like this:
Binary is read from right to left and each bit is either a 1 or a 0. Each bit represents a number with the most far right number representing a ‘1’ and the most far left bit representing ‘128’. Count all those together and you got the decimal number of one octet!
The enabled bits on the top together make up the number '25' by counting their values on the bottom together
Subnet masks and their relation to subnetting
Now, what does this has to do with subnetting? Let’s start with a subnet mask. A subnet mask determines which of all the 32 bits belong to the network, them being 0’s; and which of them belong to the hosts/computers, them being 1’s. By default we have three classes of subnets, which may look familiar to you. Under here,you can see the five classes, their ranges and their subnet mask: Class-A: 0.0.0.0 – 126.255.255.255 / 255.0.0.0 Class-B: 128.0.0.0 – 191.255.255.255 / 255.255.0.0 Class-C: 192.0.0.0 – 223.255.255.255 / 255.255.255.0 Class-D: 224.0.0.0 – 239.255.255.255 / (No subnet defined, meant for multicast traffic) Class-E: 240.0.0.0 – 255.255.255.255 / (No subnet defined, meant for research purposes)
Now remember that ‘dividing the network up into pieces’ part. ‘255’ is a broadcast address and ‘0’ marks the network, both can’t be used. With subnetting we can, for instance, make a network that starts from 0 and has broadcast address of ‘127’ and another one with a netwerk address of ‘128’ and a broadcast of ‘255’. So, we have two networks that range from ‘192.168.1.0’-‘192.168.1.127’ for network one and ‘192.168.1.128’-‘192.168.1.255’ for network two.
Why do we subnet?
Why do we subnet? Well, the main reason is because network engineers do not want to waste too many IP addresses in each network. Because you’ve probably heard or read that we already ran out of IPv4 addresses. If you, for instance, would have two routers directly connected to each other (Also called a ‘point-to-point’ connection) with a full class-C subnet, you would be wasting 252 addresses. With subnetting we could provide this same scenario with only two addresses per network but gaining 64 unique networks from that same Class-C network address.
If we would have to use a new subnet for each two routers connected to each other and do this multiple times we would need networks like this: 192.168.1.0 – 192.168.1.255 192.168.2.0 – 192.168.2.255 192.168.3.0 – 192.168.3.255, and so on.
With subnetting we would need networks like this: 192.168.1.0 – 192.168.1.3 192.168.1.4 – 192.168.1.7 192.168.1.8 – 192.168.1.11, and so on.
As you can see, this wastes way less addresses because you can see the latter example is still in the 192.168.1.x range.
My way of subnetting
Now, how do I subnet? When I subnet I use a simple trick that I learned from Jeremy Cioara, a well known person in the IT world. In this example we want to subnet 192.168.10.0 network with a mask of 255.255.255.0. This trick goes as followed:
First you think to yourself how many subnets and/or IP’s you need, depending on your case be it studying, homework or for your actual job.
Write down the decimals that equal to their binary numbers in order, like this: 128 64 32 16 8 4 2 1
Now look at the lowest possible number of the numbers you have just written down where the amount of needed IP’s will fit in. For this example we need 20 addresses, so we pick 32.
Now write all the enabled bits of your current mask down. Because we use ‘255’ three times, this means that all the bits per octet are enabled. So we write the following: 11111111.11111111.11111111.
Now, to finish the last octet, we make all the bits enabled that count up to number 32 we picked in step #3. This means we finish the mask like follows: 11111111.11111111.11111111.11100000 (Note: The last enabled bit in the octet also tells you how many maximum hosts you got minus two, in this example the third bit is enabled, so it would be: 32-2 = 30 hosts.)
Now to get your subnet mask you can either use step 6.A and/or 6.B here:
To get your CIDR you can now simply count all the enabled bits together, in this case it would sum up to be /27.
To get your decimal subnet mask you can now count up all the enabled bits and their decimal values together. For the example the bits in step 5 would be: 255.255.255.224
Congratulations you got your subnet mask!
Now you probably wonder how you know how many networks you can create when you use a certain amount of hosts. That’s easy, divide 256 with the amount of hosts and the outcome is your amount of networks. The chart right clarifies it better for you.
The less hosts, the more networks you can create from the same subnet!